Showing posts with label Sidedish. Show all posts

Wednesday, 29 January 2014

Mochai Kathirikai Varuval/Fresh Limabeans and brinjal Curry Recipe

I love the pongal season/January as it marks the beginning of summer and you can get your hands on some of the fresh produce.It is only during this season of January /February that you can find fresh mochai/lima beans in TamilNadu.These our one of my favourite legume whether fresh or dried (I have not tasted the canned or frozen ones).This mochai is a must to be added to the pongal kuzhambu or it is prepared in some form or the other on pongal day.So I thought that this would be the right time for me to prepare and post a dish using mochai.
Lima beans /mochai are rich in protein.It is suitable for people on diet as it is rich source of soluble and insoluble dietary fiber .It also aids in detoxification.Lima beans serve as a very good source of anti oxidants and folic acid.These beans contain a good carbohydrate that helps in proper metabolism.So try to include these beans in your regular diet especially those who are planning to lose weight.
Mochai Kathirikai Varuval Recipe

Method:

  1. Pressure cook the mochai with some salt and 1/2 tsp of chilly powder until soft (2 whistles).Heat oil in a pan, add the mustard seeds and once they splutter and the curry leaves.
  2. Now add the chopped onions and saute it for 2 minutes ,add the tomatoes and saute till the tomatoes become mushy,now add the powders and toss it so that all the masala powders coat well.
  3. Now add the cubed brinjal and mix well till the brijal changes color to brown , now you can close the pan and cook the brinjal in slow flame till they are cooked soft but take care not to over cook them.Now add the required salt.(remember that we have added salt to the mochai).
  4. Add the cooked mochai to the brinjal and toss them well till the mochai is well coated with the masala. Swtich off the stove and serve the curry with rice and sambhar, rasam or curd you can also have as subji with your roti it tastes great.
Mochai Kathirikai Varuval Recipe

My Notes:

  • The mochai/lima beans has to be cooked soft and not mushy.
  • You can add Fennel seeds powder gives a distinct aroma to the dish, or you can even use fennel seeds while tempering instead of the powder.
  • Mine was mildly spiced you can increase the red chilly powder as per your taste.
  • You can either slice the brinjal to thin circle or cube them .
  • I have used fresh lima beans /mochai you can substitute with dried/canned or frozen ones.
  • Chop the brinjal only when you are going to cook it ,or else keep the cut ones immersed in water as they tend to change color .Best to chop them in the last minute to avoid the brinjal turning bitter.

Wednesday, 22 January 2014

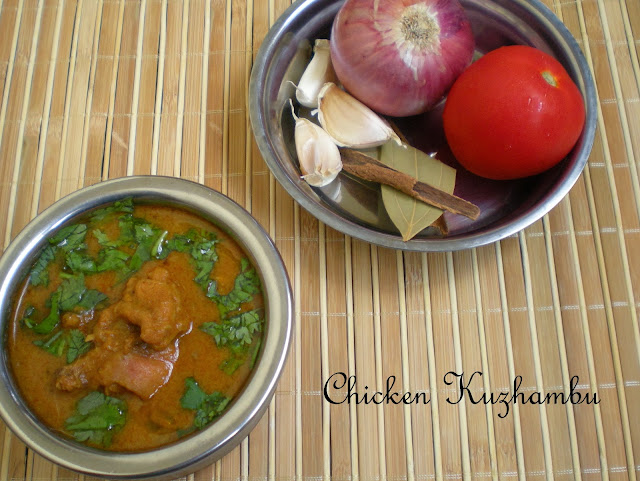
Chicken Kuzhambu (with coconut)Recipe

It was Sunday morning and I was planning for the lunch menu, as usual it was chicken,sharu and hubby wanted a chicken biriyani but I wanted to try out some new recipe (hehe blogging fever you see).But suddenly all plans got changed and I had to go shopping for new grinder in the morning not as planned in the afternoon .So I just left the marinated chicken in the fridge and off I went and was back only by 12 '0' clock,Oh I had only about 45 minutes on hand to whip up my lunch,and sharu had already started that she was hungry.I just then remember this quick recipe which I got from a friend and immediately went a head preparing this kuzhambu. This kuzhambu as my friend said was her mothers style of preparing kuzhambu. Although the list in roast and grind look long this recipe can be whipped up in a short while. Some how the chicken Kuzhambu was ready by 12.45pm as usual I clicked the photos and then started laying the table for lunch. The kuzhambu came out well and everybody enjoyed their lunch.
Chicken Kuzhambu (with coconut)Recipe

Method:

  1. Marinate the chicken for 1/2 hour with the ingredients in "To Marinate".In the meantime you can roast the items in the "To roast and grind" allow it to cool and grind it to a fine paste.
  2. Now heat oil in a pressure cooker add the ingredients in the "To Temper "list followed by the onions, when the onions turn pink add the chopped tomato and saute well .You can now add the powders , saute well add the marinated chicken,followed by salt and mix well till it is coated well with the masala.
  3. At this stage add the ground mix to the chicken , mix well, and add a cup of water and pressure cook the chicken for three whistles.After the pressure is released check for seasoning and allow the kuzhambu to boil for some more time till it reaches the required consistency.(If its too thick add some water and allow it to boil).
  4. Garnish with coriander leaves .Now your chicken Kuzhambu is ready to be served with hot rice,idly,dosa ,roti or even with a mild pulav.
Chicken Kuzhambu (with coconut)Recipe

My Notes:

  • Fried gram thickens the kuzhambu so add water accordingly.
  • You can substitute fried gram with cashews for a richer version.
  • You can even cook the kuzhambu in a pan instead of pressure cooker but it takes longer to cook.
  • This kuzhambu is of apt spiciness for our taste buds.Adjust the chilly powder to your taste.
  • You can add ginger garlic paste instead of grinding fresh ones but freshly ground masala add taste to the kuzhambu.

Friday, 17 January 2014

Pachai Pattani Poriyal/Green Peas Poriyal Recipe

After having heavy meals for the past 2 or 3 days thanks to pongal celebrations we wanted to have something light as well as easy to cook,so chose to prepare this simple peas poriyal.Now the Vegetable market is loaded with lots and lots of fresh green peas soI am tempted to prepare various dishes that use peas as peas are seasonal and are available only for few more months.Not that they are not available at other times but they aren't fresh as in this season.Moreover I hear people say that all vegetables and fruits are best had when they are in season.Whenever I prepare this poriyal I am reminded of my uncle who was a great fan of this poriyal. This poriyal used to be prepared almost 3 times a week just for him.
Now coming to the health benefits of green peas they are one of the most nutritious leguminous vegetable rich in phyto -nutrients, minerals, vitamins and anti-oxidants.Green peas are a rich source of folic acid,vitamin c ,B-complex and vitamin k.They play a great role in protection against stomach cancer.As against the belief that peas due to their sweet taste are not fit for diabetic patients , it has a low glycemic index and are diabetic friendly.Now with no more ramblings off to the recipe.
Pachai Pattani Poriyal/Green Peas Poriyal Recipe

Method:

  1. Pressure cook the peas with a pinch of salt and some water for 2 whistles or till done (soft but not mushy).Drain the water from the peas and reserve that water.
  2. Heat oil in a kadai add the items in to temper list followed by the onions and a pinch of salt and saute well.Now you can add the reserved water to the onions let them cook.
  3. Add the cooked peas after all the water has dried up check for salt ,switch of the stove and add the grated coconut ,mix well and serve with sambhar/rasam rice.
Pachai Pattani Poriyal/Green Peas Poriyal Recipe

My Notes:

  • This recipe suits best for fresh peas not for dried ones.
  • You can opt for a no onion version also .
  • You can even add regular onions but shallots or chinna vengayam tastes better.
  • A tip to retain the green color even after pressure cooking is to release the pressure manually by cooling it down and releasing it immediately .

  • Coconut can be omitted if you are on diet.
  • Friday, 27 December 2013

    Paneer Bhurji(No onion ,No garlic )Recipe

    Back after a much needed break ,a stay with my parents.We even had great time with my sister and brother.The kids also had great time playing together.Good food ,great chit chats and nice time together.We had been planning this kind of a holiday for a long time (say 2 years) and some how it wouldn't work out, finally we made last minute plans and hurray!!! it worked.We even had or rather shall I say we tried our hands at baking .Although our trial was not a super success it wasn't a flop either.So you can soon expect cakes in the blog , thanks to sis, who is a senior blogger and great baker as well.Now to the recipe this bhurji I came across while surfing through TV channels.Its a no onion no garlic recipe,tried it the next day a it came out great,that my kid had a small bowl of it as such.
    Paneer Bhurji(No onion ,No garlic )Recipe

    Method:

    1. Heat oil in a pan, add the jeera immediately add the Green chilly ginger paste and fry till raw smell leaves.
    2. Now add the cubed capsicum and saute it for 2 minutes , see to it that the capsicum doesn't loose its crunch.
    3. Add the powders and salt and saute well, finally add the crumbled paneer , mix well for a minute and switch off the stove.Your paneer bhurji is ready to serve with roti,as a stuffing for bread sandwich or chappathi roll.
    Paneer Bhurji(No onion ,No garlic )Recipe

    My Notes:

    • The original recipe called for grated ginger and finely chopped chilly but I made a paste of this as we do not like biting into bits of ginger.
    • Its a no onion no garlic recipe but you are free to added onions and ginger garlic paste.
    • You can even add grated carrots and boiled peas along with capsicum .

    Tuesday, 24 December 2013

    Chicken and Potato Gravy Recipe

    This Sunday it was chicken and potato gravy.A combination of chicken with potato can never go wrong.Actually I wanted to try a gravy from a magazine but I was hesitant as the recipe did not have any ginger garlic paste ,so just made adjustments to suit our taste.The gravy came out well,and I got a thumps up from my daughter thats a great compliment.Her christmas holidays are on and she is much excited at visiting her grandparents.Hope to have a nice time ,even my sister is coming over and hope we have a nice time together.Next post I will update about all the fun we had.Coming to this recipe its an easy one without much fancy ingredients.
    Chicken 'n' Potato Gravy  Recipe

    Method:

    1. Marinate the chicken for 1/2 hour with the ingredients in "To Marinate".In the meantime you can chop the onion,potatoes and tomato as well as grind the "To Grind" ingredients to a fine paste.
    2. Now heat oil in a pressure cooker add the ingredients in the "To Temper "list followed by the onions, when the onions turn pink add the chopped tomato and ginger garlic paste .You can now add the powders, saute well ,add the marinated chicken,followed by salt and mix well till it is coated well with the masala.
    3. At this stage add the ground mix to the chicken , mix well, and add a cup of water and pressure cook the chicken for two whistles.After the pressure is released check for seasoning and add the potatoes and cook for one more whistle.Now your chicken potato gravy is ready to be served with hot rice,idly,dosa ,roti or even with a mild pulav.
    Chicken 'n' Potato Gravy  Recipe

    My Notes:

    • You can omit the potato and make it as chicken Gravy,but potatoes add volume to the gravy and blend well with chicken.
    • Grinding the coriander leaves along with the tomato enhances fresh aroma to the gravy .
    • You can even cook the gravy in a pan instead of pressure cooker but it takes longer to cook.
    • This gravy is of apt spiciness for our taste buds.Adjust the chilly powder to your taste,mine was not very spicy.

    Sunday, 22 December 2013

    SenaiKizhangu Vadai(Yam Vadai)Recipe

    The recipe I want to share is amma's recipe ,she makes this vadai once in a way and my kid loves having this when we visit my mothers place.She calls it "kuttti vadai".Amma says that we should add senai kizhangu in our diet atleast once a week,I usually prepare a varuval(lazy),but I wanted to try this for the blog hey blogging had brought the better side of me.My kid is happy that I blog as she gets to eat different food items,all thanks to blogging. Senai kizhangu or some call it karunai kizhangu in Chennai has great medicinal properties ,its a good medicine for piles.I also read in "Snehidhi"(tamil magazine)that it serves as a healthy food for teenaged girls. Although it is deep fried you can have it once in a while.
    SenaiKizhangu Vadai(Yam Vadai)Recipe

    Wednesday, 18 December 2013

    Chana Masala(Dry) Recipe

    I was reminded of my school days when this recipe came to mind. Mom used to make this specially for me. I would love to have it with any variety rice especially coconut rice this masala would add a spicy touch to the otherwise bland coconut rice. But somehow I totally forgot this recipe. Last week when I was breaking my head for an easy and different recipe to try with chana this recipe came to my mind.I immediately soaked the chana to try masala. This recipe is a dry version and quite different from the ones that use ginger garlic paste and garam masala. This is a SouthIndian version.It can be served with rice and also with roti. We had it with "Methi roti".It was a great combo. Try it yourself.
    Chana Masala(Dry) Recipe

    Thursday, 12 December 2013

    Sprouted Peas Masala Recipe

    Our doctor always recommends us to include sprouts in our menu everyday, so I keep looking for any chance to include it.This masala is easy and quick one provided you have dried or fresh peas sprouts on hand.You can even try this with unsprouted fresh peas or soaked ones also.The masala goes well with any variety rice or sambar rice and also with roti equally.Now off to the recipe.
    Sprouted Peas Masala Recipe

    Method:

    1. Pressure cook the sprouted peas for 2 or 3 whistles(do not over cook)with salt and turmeric powder.
    2. Heat oil in a kadai and the items in "to temper" list, then add the onions along with a pinch of salt, add the chilly and garam masala powders and saute till raw smell leaves.
    3. Add the cooked peas and toss till the masala is coated well. Your sprouted peas masala is ready to serve with rice ,roti or even in your sandwich.
    Sprouted Peas Masala Recipe

    My Notes:

    • Mine is a dry version you are free to add a tbsp of coriander powder while sauting and 1/2 cup of water to make a thin gravy.
    • If you do not like biting on fennel seeds you can use fennel seeds powder.But I would recommend the use of fennel as whole or in powder form for this enhances the taste of the dish.

    Monday, 9 December 2013

    Kongunad Chicken Curry Recipe

    On a lazy sunday morning while gazing at newspaper this recipe caught my attention.What better day to try a new dish than a sunday .So I decided its going to be this chicken curry for lunch.I was pretty sure this would win hands down while I was roasting the masala itself.The aroma of fresh spices and coconut being roasted wafted the kitchen.My kid enjoyed her sunday lunch with this curry with rice and chicken65.
    Kongunad Chicken Curry Recipe

    Method:

    1. Roast the ingredients in "To roast and grind" in oil, cool and grind to a smooth paste.
    2. In a kadai heat the oil add the ingredients in "To temper" and then saute the onions,once the onion turns pink add the chopped tomatoes,salt,chilly powder and turmeric powder.
    3. Add the cleaned chicken pieces and saute well .Now add in the ground masala and water to cook the chicken.Cover and cook for about 10 minutes .
    4. Your Kongunad chicken curry is ready to serve with rice or dosa.
    Kongunad Chicken Curry Recipe

    My Notes:

    • The original recipe called for poppy seeds also to be roasted and ground but I did'nt add any.
    • The amount of green ,red chillies and peppercorns can be altered as per need.
    • I added chilly powder for color sake and reduced the amount of peppercorns.
    • This gravy is of apt spiciness for our taste buds.

    Friday, 6 December 2013

    Noolkol Kurma Recipe

    This NoolKol(kohl rabbies) kurma goes well with rice as well as with roti ,dosa,idly and even idiyappam.It is a regular in our house atleast once in ten days.altough my kid is not fond of it with rice she loves having kurma with dosa.This kurma can be made using other veggies like potato,peas,carrot,beans as mixed veg kurma.
    Noolkol Kurma Recipe

    Method:

    1. First grind the coconut along with the onion to a smooth paste and set aside.
    2. Take a pressure cooker ,heat oil and add the ingredients under "to temper".You will get the good flavour of the spices frying in oil.
    3. Add in the onion and saute till it turns pink, then followed by tomatoes,curry leaves and ginger garlic paste.
    4. Add in a pinch of sugar while frying ,this enhances the taste and color of the kurma.Add the chopped noolkol and saute for a minute and add the masala powders and salt.
    5. Fry this for 2 more minutes, add about 1/2 a cup of water and pressure cook for three whistles.
    6. After cooker cools down open it and add the ground coconut mix.Allow it to boil for not more than a minute and switch off the stove.
    7. Transfer it to the serving bowl and garnish with coriander leaves.Serve hot with rice,roti or dosa.
    Noolkol Kurma Recipe

    My Notes:

    • Noolkol can be replaced by potato and peas or a mix of veggies as you wish.
    • We usually make it for lunch and use the remaining for dinner along with Roti or dosa.